Step 2Ba: The SCAN Method
Tip
Download the template folder for this step by clicking the button below and work on the files in the template folder as you read through this tutorial.
In a SCAN calculation, we want to map how a reaction proceeds by gradually changing the distance between two atoms. The SCAN calculation works as follows:
- Perform a geometric optimisation on the chemical system, where the distance between two atoms are fixed.
- Repeat the geometric optimisation on the same chemical system, where the position of the two atoms is changed by \(dx\).
- Repeat this until the distance between the two atoms changes to the desired final length.
To perform a SCAN, we first include this line in our input file:
The tags here indicate you want to do the following:
OPT: Indicates you want ORCA to perform local optimisations during your SCAN calculation.TightSCF: Tells ORCA to tighten the convergence criteria for each electronic step.defgrid2: Indicates how fine we want the intergration grid to be (This is the default)NormalOPT: Indicate we want to use normal geometric convergence settings.
Tip
For these calculations we want to use NormalOPT rather than TightOPT because we are only wanting to get a good idea of what the transition state looks like.
NormalOPTis ideal for SCAN calculations as it is the usual convergence criteria for performing optimisations, and will run faster than usingTightOPT.- However, if you have problems with convergence issues, you can try using
TightOPT. See the ORCA 6.1.0 Manual, page 618 for more information.
We also include the following lines:
%GEOM
    SCAN B atom_index_1 atom_index_2 = initial_distance, final_distance, linespace+1 END
END
where:
atom_index_1: This is the index of the first atom. Obtain this usingase gui.atom_index_2: This is the index of the second atom. Obtain this usingase gui.initial_distance: The initial distance between the two atoms. Get this by measuring the distance between the two atoms in your system using a GUI (such as avogadro orase gui) and record it here.final_distance: The final distance between the two atoms.linespace: The number of SCAN steps you want to perform.
An example for these lines is given below:
In this example, we have told ORCA to begin by setting the distance between atom 11 and 16 to 3.245 Å, and then decrease the distance between these two atoms to 0.745 Å in increments of \(\frac{3.245-0.745}{126-1} = 0.02\) Å.
NOTE 1
You will want to measure the initial distance between your two atoms using a GUI like ase gui. This is the value you want to put in for the initial bond distance.
- This is how I got the bond distance between atom 11 and 16 to 3.245 Å for this example.
NOTE 2
ORCA counts atoms starting from 0. This means that in some GUIs (like GView), atom 11 here is atom 12 in GView. In the ASE GUI and all the programs given here, atoms numbers are equal to ORCA. I.e.: atom 11 in the ASE GUI means atom 11 in ORCA.
NOTE 3
We have set the number of steps to perform to 126 rather than 125. This is because we are including the endpoint in our SCAN, and I want the increments to be spaced by a rational value (i.e.: \(\frac{3.245-0.745}{126-1} = 0.02\) Å step size).
- This is just a personal preference of mine, and is not a hard rule.
In this example, we are looking at how a Cu atom could insert itself into a C-H bond. The orca.inp file for this example is given below (also located here):
!B3LYP DEF2-TZVP D3BJ
!OPT NormalOPT TightSCF defgrid2 # Try TightOPT if you have convergence problems.
%SCF
MaxIter 2000 # Here setting MaxIter to a very high number. Intended for systems that require sometimes 1000 iterations before converging (very rare).
DIISMaxEq 5 # Default value is 5. A value of 15-40 necessary for difficult systems.
directresetfreq 15 # Default value is 15. A value of 1 (very expensive) is sometimes required. A value between 1 and 15 may be more cost-effective.
END
%CPCM EPSILON 6.02 REFRAC 1.3723 END
%PAL NPROCS 32 END
%maxcore 2000
%GEOM
    SCAN B 11 16 = 3.245, 0.745, 126 END
END
* xyzfile 1 1 opt_product.xyz
Outputs from ORCA
As well as the output.out and orca_trj.xyz files, ORCA will also give:
- A series of files called
orca.001.xyz,orca.002.xyz,orca.003.xyz, ... up toorca.126.xyz. These are the steps in the SCAN process.
NOTE
The orca_trj.xyz contains the xyz files for every geometric optimisation across all SCAN steps, so it can be unhelpful to view on its own. However, keep it as it will be used by the viewORCA program.
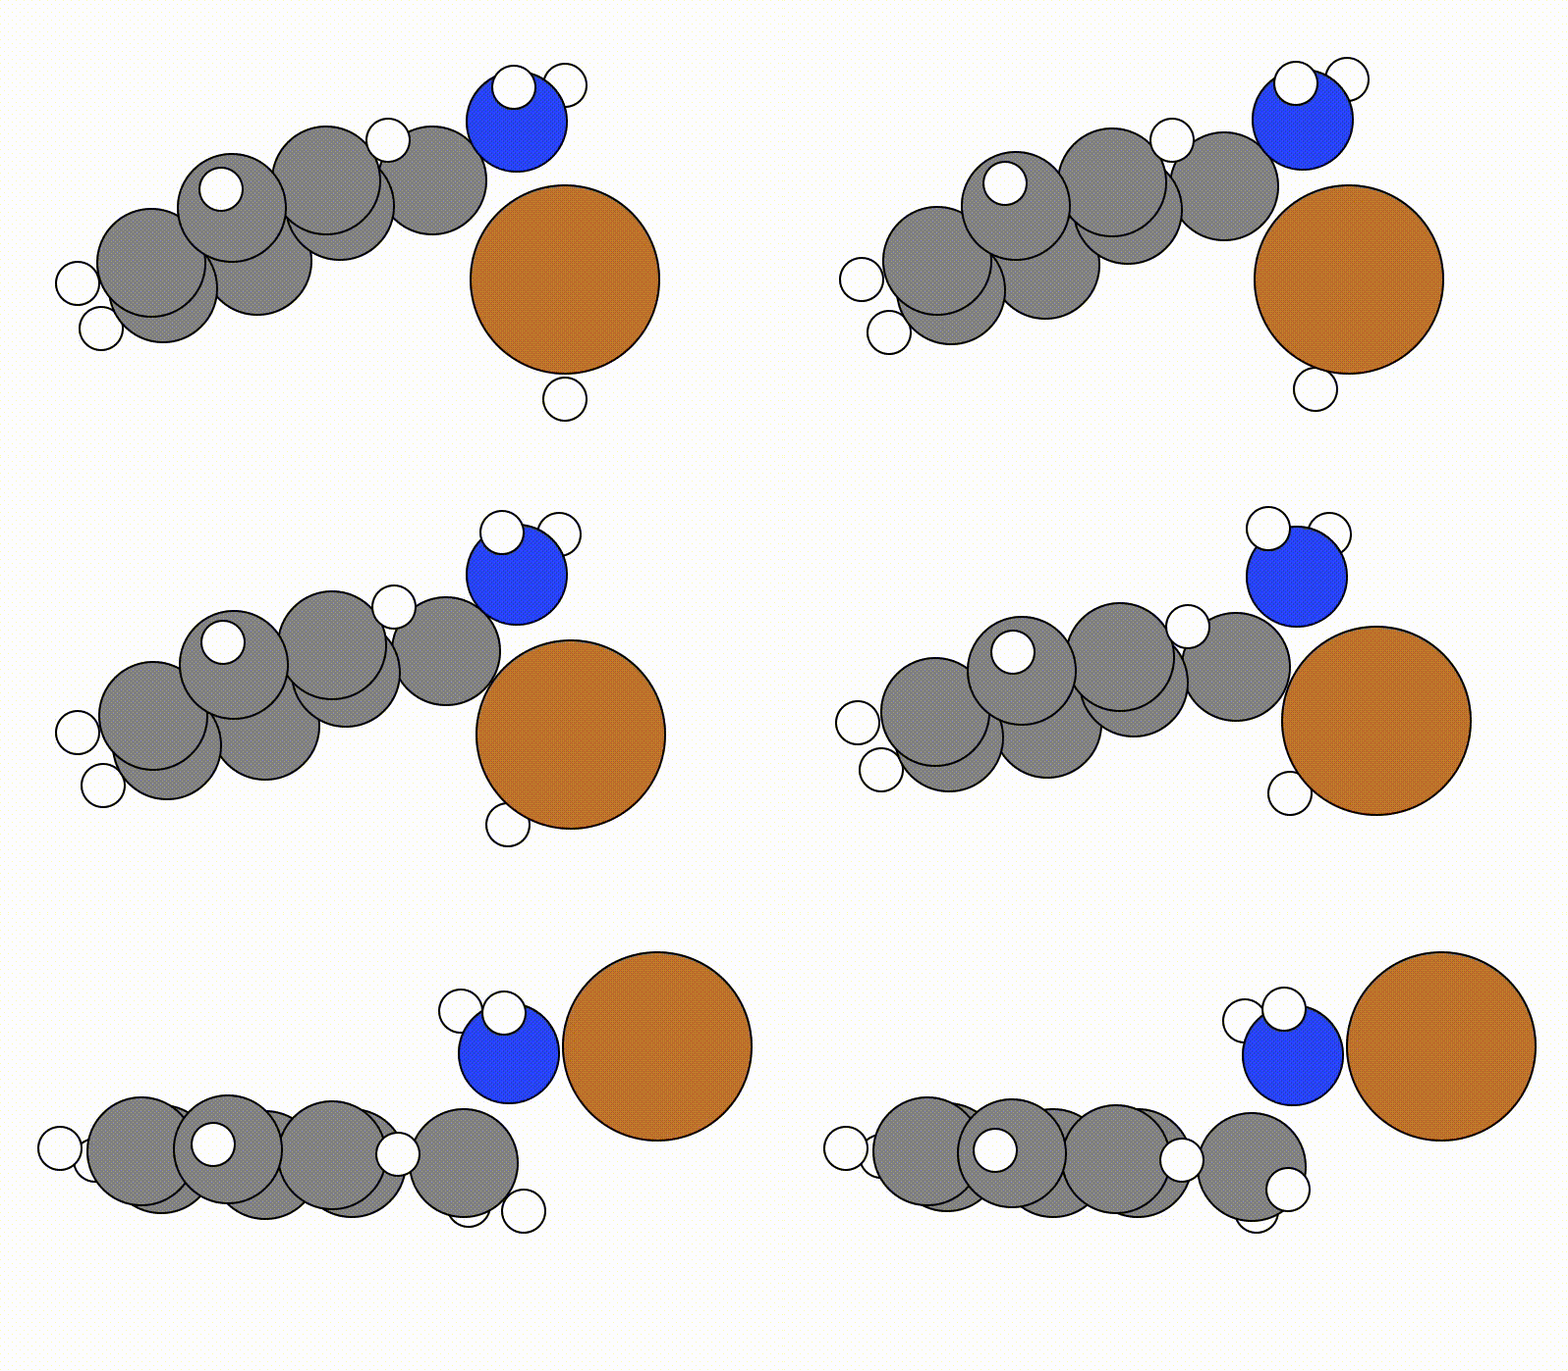
To view the SCAN mechanism and the energy path, type viewORCA scan in the terminal and hit enter. This will load a program that will allow you to see how the SCAN calculation performed your mechanism, along with the energy profile.
# cd into your optimisation folder
cd ORCA_Mechanism_Procedure/Examples/Step2_Find_TS/SCAN

# View the SCAN calculation
viewORCA scan
NOTE 1
viewORCA scan will also create a xyz file called SCAN_images.xyz that you can copy and view on your own computer.
- If you just want to create the
SCAN_images.xyzfile, type into the terminalviewORCA scan --view False(which will create theSCAN_images.xyzfile without launchingase gui).
Once you run viewORCA scan, you will get a GUI that shows you the following SCAN pathway:

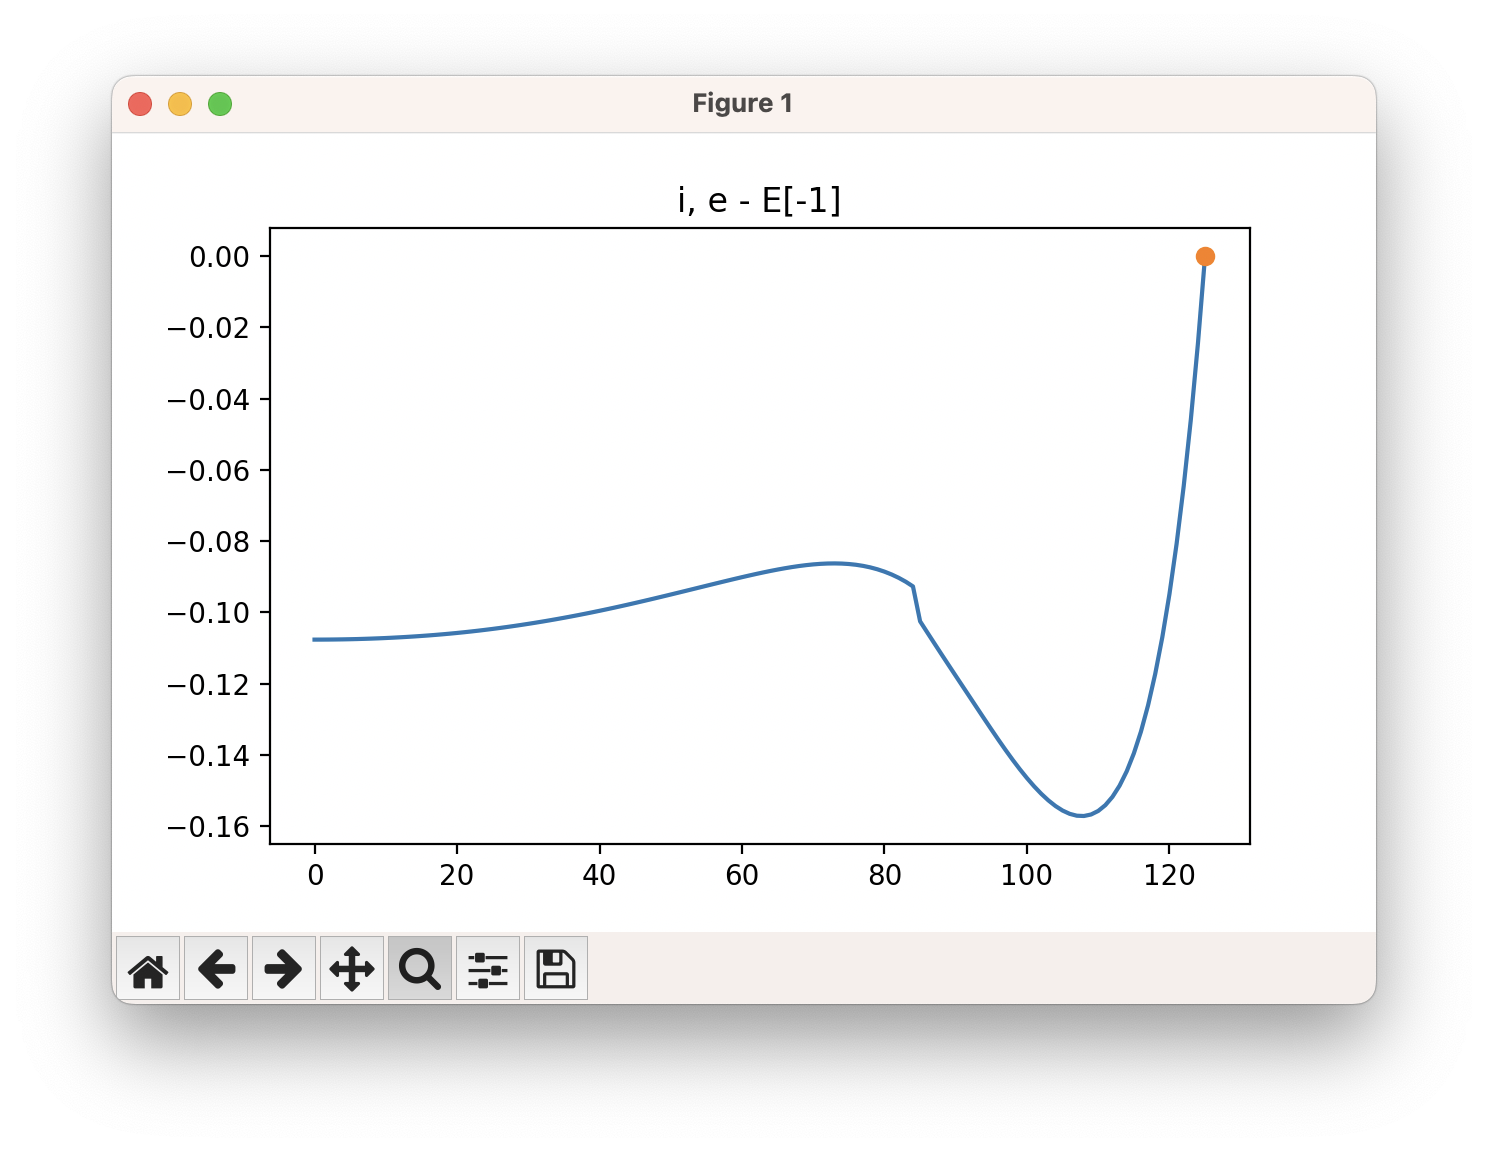
The energy profile for this example is given below:

NOTE 2
The energy goes up at the end because the hydrogen atom is probably getting too close to the carbon atom. We can ignore this part of the SCAN (after around step 110), as it is not relavant to us for finding the transition state for this mechanistic step.
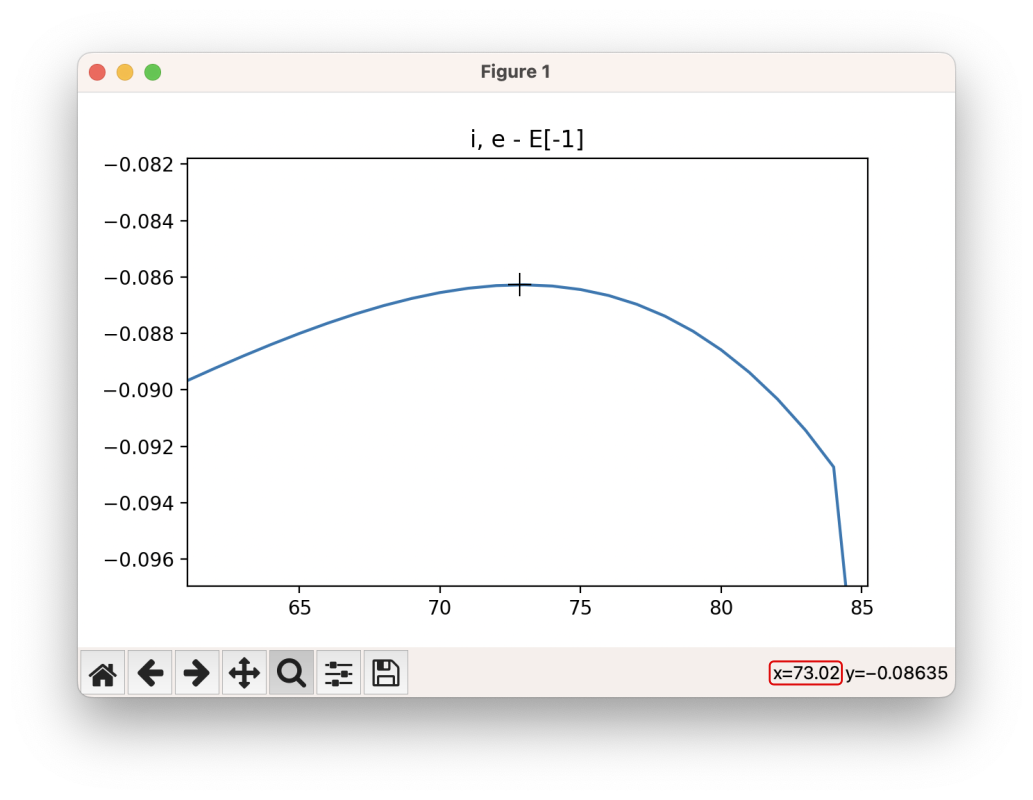
The easiest way to use this GUI is to zoom in on the part of the energy profile looks like the transition state (by clicking on the ![]() button), and from this determine the image this corresponds to by looking at the x axis. Move the cursor over the highest point along the energy profile, and read the x value:
button), and from this determine the image this corresponds to by looking at the x axis. Move the cursor over the highest point along the energy profile, and read the x value:

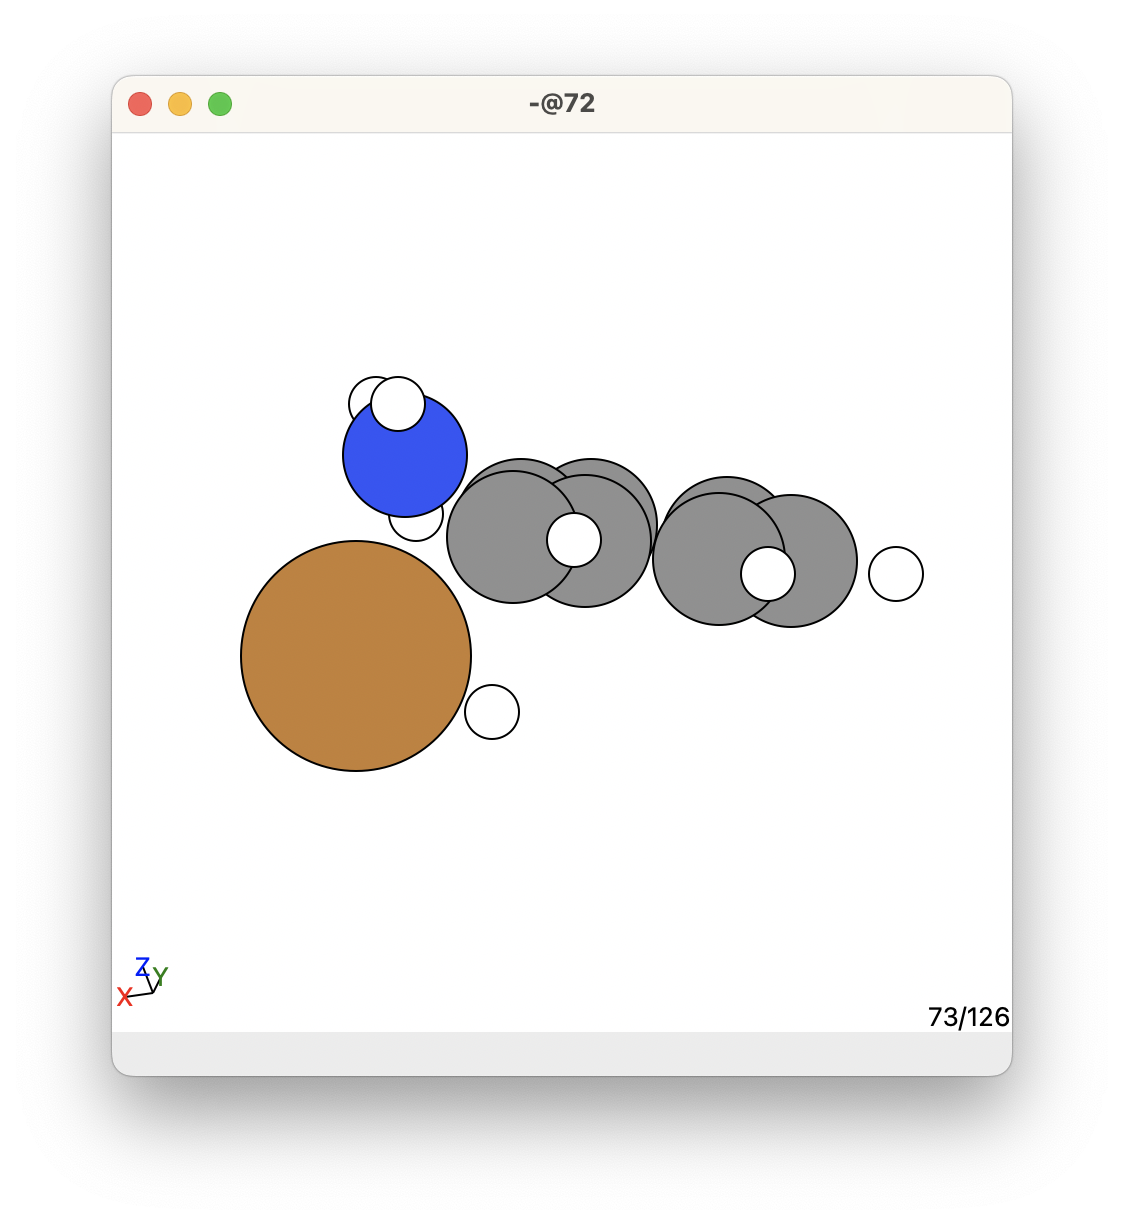
This is what the given transition state looks like in this example:

This is a promising transition state, but we need to proceed with steps 3 and 4 to make sure it is ok.
Once ORCA has finished and you have viewed your SCAN pathway and obtained your transition state, you should do the following check:
Check: Does the SCAN path make sense chemically and physically
You will want to look at the SCAN path and check if it chemically and physically makes sense. If it does not, you need to redo the SCAN and try something else, like making the two atoms contract closer to each other rather than stretch, or maybe try contracting or expanding the distance between other atoms.
Advice about SCANs
In this example, I forced the SCAN to gradually decrease the distance between atom 11 (C) and atom 16 (H). However, this is not the only way I could have performed this SCAN.
- For example, I could have started with the Cu atom bonded to the N atom, and gradually decrease the distance between atoms 11 (C) and 17 (Cu) to force them to form a bond.
- I decided to start with a C-Cu-H bond and force the C and H to come together because I thought this was the best way to obtain the transition state for this mechanistic step.
- It is not uncommon that you need to try a few different SCAN paths to get the transition state you are looking for.
What should I do if I need to restart a SCAN run
Sometimes a SCAN job may fail. However, rather than resetting the SCAN job from beginning, you may want your SCAN job to resume from the last converged SCAN image.
If you want to restart the SCAN job from the last converged image, here is a guide to how to do this (click here to see the example files for this procedure in Github):
-
If you are restarting your SCAN job for the first time: Make a new folder called
SCAN_1, and move all your SCAN files into this folder. Do this by running the lines below in your terminal: -
Make a new folder called
SCAN_2: -
Copy the ORCA input file, slurm submit file, and the last converged SCAN xyz file. This is the latest numbered xyz file. An example of this is given below:
-
Change directory into the new SCAN folder, then change the name of the last converged SCAN xyz file to another name, such as
last_converged_SCAN_image_restart.xyz -
Open the copied
orca.inpfile, and make two changes to this file-
Change the name of the xyz file give in in the
xyzfileline tolast_converged_SCAN_image_restart.xyz -
In the
GEOMsection:- Change the bond distance between the two atoms of interest as given in
last_converged_SCAN_image_restart.xyz. Get this by measuring the distance between the two atoms of interest inase gui last_converged_SCAN_image_restart.xyz - Change the number of SCAN iterations to perform in order to keep displacement between SCAN images the same. For example, here the original displacement was \(\frac{\rm{d_f} - \rm{d_i}}{(\rm{no.\:SCAN\:interations})-1} = \frac{3.245 - 0.745}{126-1} = 0.02\). The distance between atoms 11 and 16 in
last_converged_SCAN_image_restart.xyzis2.285 Å. Therefore, we need to perform \(\frac{d_f(\rm{new}) - d_i}{\rm{displacement}}+1 = \frac{2.085 - 0.745}{0.02}+1 = 68\) (The \(+1\) is so we include the initial image in the SCAN procedure).
An examples of the two components of
GEOMthat need to be changed are given belowFor example:
- Change the bond distance between the two atoms of interest as given in
An example of the updated
orca.inpfile is shown belowExample of the orca.inp file for the updated SCAN job!B3LYP DEF2-TZVP D3BJ !OPT NormalOPT TightSCF defgrid2 # Try TightOPT if you have convergence problems. %SCF MaxIter 2000 # Here setting MaxIter to a very high number. Intended for systems that require sometimes 1000 iterations before converging (very rare). DIISMaxEq 5 # Default value is 5. A value of 15-40 necessary for difficult systems. directresetfreq 15 # Default value is 15. A value of 1 (very expensive) is sometimes required. A value between 1 and 15 may be more cost-effective. END %CPCM EPSILON 6.02 REFRAC 1.3723 END %PAL NPROCS 32 END %maxcore 2000 %GEOM SCAN B 11 16 = 2.085, 0.745, 68 END MaxIter 200 END * xyzfile 1 1 last_converged_SCAN_image_restart.xyzNote
I have also included
MaxIter 200in thrGEOMsection. This was because I was having convergence issues because the number of geometry optimisations was going over the default value of50. I increased this to200so that it would run without problems in this example. -
-
Submit your ORCA job to slurm, or run your ORCA job however you usually run ORCA.
Once your SCAN job has completed to your satisfaction, you can use viewORCA scan to view all your SCAN runs together. To do this, run viewORCA scan in the folder containing your SCAN_1, SCAN_2, SCAN_3, ... folders. viewORCA scan will collate all the SCAN jobs together in numerical order so that it looks as if only one SCAN job ran.
Tip
viewORCA scan will also still create a SCAN_images.xyz file, containing the SCANs from all your SCAN folders pasted together.
Note
- Click here to see the example files for this procedure in Github.
- Click here for the
SCAN_images.xyzcreated for this restarted SCAN job. You should see that it gives the sameSCAN_images.xyzfile as if the SCAN job ran successfully in one go (as given here).
Other information about performing SCAN calculations in ORCA
Click here to learn more about SCAN calculations from the ORCA Input Library.
Note
The ORCA Input Library is a great source of information about performing calculations in ORCA.
Troubleshooting the SCAN calculation
Here are some troubleshooting tips for performing this optimisation step.
No troubleshooting issues have been found yet.
Info
If you have any issues about this step, raise a New issue at the Issues section by clicking here.